You can verify that your sound card is functioning properly by recording data and then playing back the recorded data. Recording data uses the sound card's analog input subsystem, while playing back data uses the sound card's analog output subsystem. Successful completion of these two tasks indicates your sound card works properly. The data to be recorded can come from two sources:
A microphone
A CD player
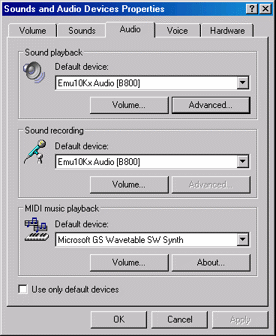
The first thing you should do is enable your sound card's ability to record and play data. This is done using the Microsoft Windows® Sounds and Audio Devices Properties dialog box. You can access this dialog box using the Windows Start button.
Select Start > Settings > Control Panel, then double-click Sounds and Audio Devices.
The Sounds and Audio Devices Properties dialog box is shown below, and is configured for both playback and recording.
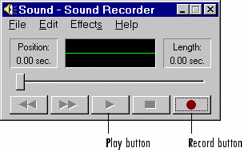
You can record data and then play it back using the Windows Sound Recorder panel. To access this application, select the following:
Start > Programs > Accessories > Entertainment > Sound Recorder
The figure below shows how to record and play data.
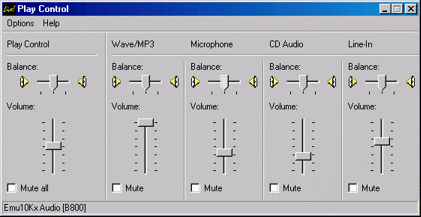
You must also make sure that your microphone or CD player is enabled for recording and playback using the Windows Volume Control panel. To access this application:
Start > Programs > Accessories > Entertainment > Volume Control
The Volume Control panel is shown below. The CD, microphone, and line devices are enabled for playback when the Mute check box is cleared for the CD, Microphone, and Line volume controls, respectively. You can play .WAV files by leaving the Mute check box cleared for the Wave volume control.
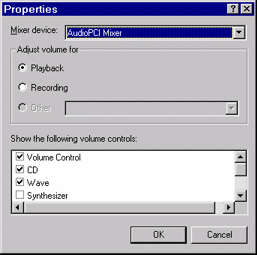
If the CD, microphone, or Wave Output controls do not appear in the Volume Control panel, you must modify the playback properties by selecting Properties from the Options menu.
The Properties dialog box is shown below for playback devices. Select the appropriate device check box to enable playback.
To verify if the CD and microphone are enabled for recording, click the Recording option in the Properties dialog box, and then select the appropriate device check box to enable recording. The Properties dialog box is shown below for recording devices.
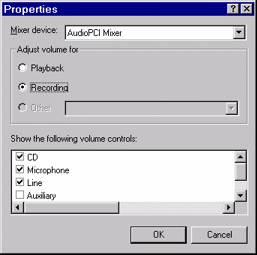
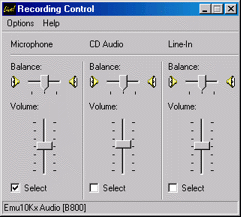
The Recording Control panel is shown below. You enable the CD or microphone for recording when the Select check box is selected for the CD or Microphone controls, respectively.
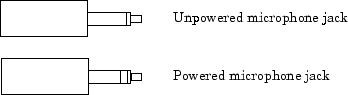
Your microphone will be one of two possible types: powered or unpowered. You can use powered microphones only with Sound Blaster or Sound Blaster-compatible microphone inputs. You can use unpowered microphones with any sound card microphone input. Some laptops must use unpowered microphones because they do not have Sound Blaster compatible sound cards.
As shown below, you can easily identify these two microphone types by their jacks.
You can find out which sound card brand you have installed by clicking the Devices tab on the Sounds and Audio Devices Properties dialog box.
To test your sound card with a microphone, follow these steps:
Plug the microphone into the appropriate sound card jack. For a Sound Blaster sound card, this jack is labeled MIC IN.
Record audio data by selecting the Record button on the Sound Recorder and then speak into the microphone. While recording, the green line in the Sound Recorder should indicate that data is being captured. If this is the case, then the analog input subsystem on your sound card is functioning properly.
After recording the audio data, save it to disk. The data is automatically saved as a .WAV file.
Play the saved .WAV file. While playing, the green line in the Sound Recorder should indicate that data is being captured. If this is the case, then the analog output subsystem on your sound card is functioning properly.
If you are not able to record or play data, make sure that the sound card and input devices are enabled for recording and playback as described in the beginning of this section.
To test your sound card with a CD player, follow these steps:
Check that your CD is physically connected to your sound card.
Open your computer and locate the back of the CD player.
If there is a wire connecting the Audio Out CD port with the sound card, you can record audio data from your CD. If there is no wire connecting your CD and sound card, you must either make this connection or use the microphone to record data.
Put an audio CD into your CD player. A Windows CD player application should automatically start and begin playing the CD.
While the CD is playing, record audio data by clicking the Record button on the Sound Recorder. While recording, the green line in the Sound Recorder should indicate that data is being captured. If this is the case, the analog input subsystem on your sound card is functioning properly. Note that the CD player converts digital audio data to analog audio data. Therefore, the CD sends analog data to the sound card.
After recording the audio data, save it to disk. The data is automatically saved as a .WAV file.
Play the saved .WAV file. While playing, the green line in the Sound Recorder should indicate that data is being captured. If this is the case, then the analog output subsystem on your sound card is functioning properly.
If you are not able to record or play data, make sure that the sound card and input devices are enabled for recording and playback as described in the beginning of this section.
© 1984-2008 The MathWorks, Inc. •