 |
We have dealt with the Level 0 view of computers in much detail in Chapters 3 and 4. In chapter 5 we have seen how digital logic components can be connected together, and, with a bit of microcode glue can be made to perform useful elementary operations - like adding the contents of a memory location to the accumulator (ADDD).
We now come to constructing sequences (programs) of these elementary operations (ADDD, LODD, JUMP etc. ...) to do useful tasks. This chapter will concentrate on the basics: sequence, selection,
In addition we will describe the operation of a two-pass assembler and show how this can be done manually.
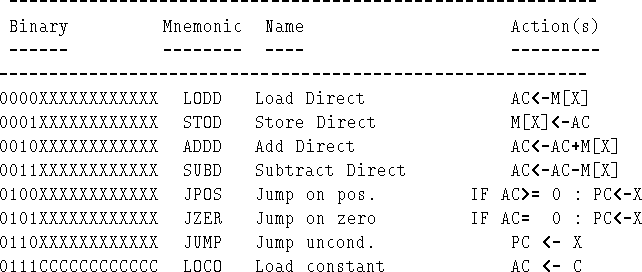
We now want to write some programs for the Mac-1A. For completeness, we repeat Figure 5.2 as Figure 6.1.
We can write in binary machine code, using Figure 6.1; but, that is tedious and error prone - because of the distraction of having to translate into a numeric code. It is better to use the mnemonics. The assembly code can then be assembled to machine (executable) code; this is done using a program called an assembler.
For the purposes of this chapter, assembly language is a language in which there is one-to-one relationship between symbolic instructions and machine instructions; we will come across pseudo-instructions that are really instructions to the assembler program, but these will be obvious.
In the following examples, if we need to mention actual addresses, we will start all code at 100H and all data at 500H. Note again that the largest address is FFFH (12 bits). Also, be careful with FFFC onwards (409210 to 409510, which are used for memory-mapped input-output, see Chapter 5.
Often, for brevity, we will assume variables that variables a0, a1, a2 ... (integers) have been declared and are already in locations 500, 501, 502, .... Alternatively, we will use symbols for data. Use these assumptions in the exercises where appropriate.
Program. Add the integer in a1 to the integer in a0
and put the result in a2, i.e.
a2 = a0 + a1;
In assembly code:
Start:    LODD a0   /get a0 into accum.
          ADDD a1   /accum. gets a0+a1
          STOD a2   /store result in a2
There are four fields in an assembly instruction:
For a real assembler, we would have to declare all variables. And, tell it where to start main program at. E.g. in the example above,
DW a0 10H  /a0 is a WORD type, initialised to 10H
DW a1 22H  /these are not executable instructions
DW a2      /but pseudo-instructions
           /ie. directives to the assembler to allocate
           /storage and associate names with that storage
           / just like you declare variables in Pascal

ORG       100H      /start prog. at 100H
      if(a0==a1) a2 = a2 + 1;
      else  next instructions...
If:       LODD a0
          SUBD a1
          JZER Then
          JUMP Next
Then:     LOCO 1   /load constant 1
          ADDD a2
          STOD a2
EndThen:  JUMP Next  /Unnecessary
Next:     ...
     if(a0==a1) a2 = a2 + 1;
     else a2 = a2 + 2;
     //next instructions...
If:       LODD a0
          SUBD a1
          JZER Then
Else:     LOCO 2
          ADDD a2
          STOD a2
          JUMP Next
Then:     LOCO 1
          ADDD a2
          STOD a2
EndThen:  JUMP Next  /Unnecessary
Next:     ...
   //sum first n integers
   int sum=0;
   int i=0;
   while(i<=n){
     sum= sum + i;
     i++;
   }
init:    LOCO 0
         STOD sum
         STOD i
loop:    LODD n
         SUBD i
         JPOS loopend
loopbody:
         LODD sum  /load sum into accumulator
         ADDD i    /add i to it
         STOD sum  / and don't forget to store the result!
incr:    LOCO 1
         ADDD i
         STOD i
         JUMP loop
loopend: ...
It is straightforward to define deterministic loops, for example,
          for(i = 0; i<n; i++){
            sum= sum + i;
          }
in terms of do-while. Likewise do-until - the
continuation test is merely carried out at the end of the loop, instead
of at the beginning for do-while.
Let us see how the If-then-else from the previous section would assemble into machine code. We use Figure 6.1 to translate.
For ease of understanding, we show the assembly language in the table. Assume
that, initially, a0 contains 8, a1, 4 and
a2, 2.
<-- Assembly language --->  <------- Machine code ------------>
                             Address   Instruction/Data
If:       LODD a0            0100      0500
          SUBD a1            0101      3501
          JZER Then          0102      5107
Else:     LOCO 2             0103      7002
          ADDD a2            0104      2502
          STOD a2            0105      1502
          JUMP Next          0106      610B
Then:     LOCO 1             0107      7001
          ADDD a2            0108      2502
          STOD a2            0109      1502
EndThen:  JUMP Next          010A      610B
Next:     ...                010B      ...
                             ...
a0                           0500      0008
a1                           0501      0004
a2                           0502      0002
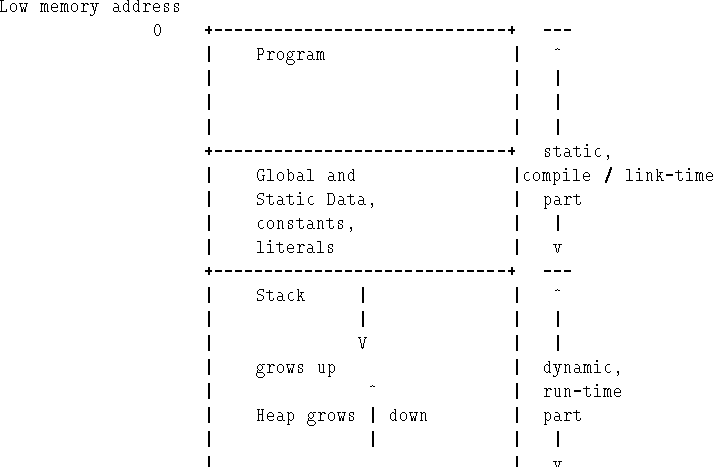
Thus, we can identify two separate sections of memory: (a) program, (b) data. Of course, there is nothing really separating these, and there is nothing to stop assembly programmers modifying instructions as data, nor, for that matter, runaway programs attempting to execute data!
Actually, as shown in Figure 6.2, in a C or C++ program, we can identify four sections of memory. Exact implementation detail may differ depending on compiler, machine architecture and operating system. In some contexts, Figure 6.2 is called a memory map.
Assembly is the process of translating the symbolic assembly code into (numeric) machine code.
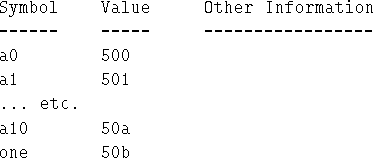
DW a0 /shown here for completeness
DW a1
....
DW a10
DW one 1
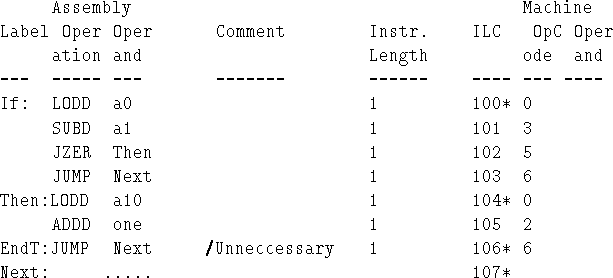
If: LODD a0
SUBD a1
JZER Then
JUMP Next
Then: LODD a10
ADDD one
EndThen: JUMP Next /Unnecessary
Next: .....
This section describes how a two-pass assembly program works. We said that one assembly language instruction maps to one machine instruction; thus, it would appear natural to run through the list of assembly instructions and translate them using a table such as Figure 6.1.
This works fine until we get to JZER Then; what address is Then?
You don't know until you have assembled up to Then.
Therefore, we must have a symbol table - - which is a list of (symbol, address) pairs. If a symbol has been entered in the table, then you can look up its value. Initially, the table is empty.
Also we must have an operation-code (op-code) table - similar to the symbol table, only it is fixed, and contains a table relating instruction code (LODD, STOD, ...) to the 4-bit op-code part of the instruction (0001, 0010, ...). In general, this should also contain the length of each instruction, or some means of calculating it. Unlike most machines, Mac-1a has a single fixed instruction length of one; most machines have instruction lengths which vary according to the instruction.
The main job of pass one is to build the symbol table.
Now the symbol table is complete and we can complete the translation by filling in the operand fields; see Figure 6.6.
Also, we may require the data area must be initialised - to zero or some appropriate default.
Here in a slightly less formal way, is a recipe for assembling manually. We do it in a table, first write down the assembly code, the make two columns, one for address, the other for instruction or data. Then translate using Figure 6.1.
Do it in two passes. Leave Jump addresses blank first time round - you don't know the Jump destination addresses until after you have coded the Jump destination.
Use Hexadecimal for the machine code. If necessary, separate the binary fields in Figure 6.1 into groups of four - one for each Hex. digit, and add another column to Figure 6.1 to contain the Hex. representation of the operation code (op-code).
LABEL   ASS. INSTR.      ADDR.     BINARY INSTR.
------------------------------------------------
If:       LODD a0        100       0500
          SUBD a1        101       3501
          JZER Then      102       5(Then)
          JUMP Next      103       6(Next)

Then:     LODD a10       104       050A
          ADDD one       105       250B

EndThen:  JUMP Next      106       6(Next)

Next:     .....          107
Now, we know that Then = 104, Next = 107. So we can complete the
assembly:
LABEL   ASS. INSTR.      ADDR.     BINARY INSTR.
------------------------------------------------
If:       LODD a0        100       0500
          SUBD a1        101       3501
          JZER Then      102       5104
          JUMP Next      103       6107

Then:     LODD a10       104       050A
          ADDD one       105       250B

EndThen:  JUMP Next      106       6107

Next:     .....          107
If the program above was viable to work on their own, it would be possible to load it into the addresses given: 100 to 107 for program and 500 to 50b for data, set the PC to 100, and the program would run.
Unfortunately, programs are usually made up from more than one module, and the results of each module translation - object files - must be linked together to produce an executable program.
Essentially, at the end of pass two, there will be symbols for which you do not have an address; these will refer to subprograms (see Chapter 7) that are contained in other modules. Also, the ILC will need to contain relative addresses, not absolute addresses as above.
In linking and loading the main jobs to be done are:
Refer also to Figure 6.2.
We further discuss linking (along with issues surrounding compilation and interpretation) in Chapter 9.
In the following, unless specified, assume the executable code is to start at
is at 100Hex, and a0, a1, a2, ... at 500, 501, 502 (Hex), ...
a10 = a0;
         if( a1==a0 ) a10 = 1;
         else         a10 = 0;
        if( a1>a0 ) a10 = 1;
        else        a10 = 0;
        if( a1<a0 ) a10 = 1;
        else        a10 = 0;
a3 = a2 - a1;
a3 = a2*2;
a3 = a2*3;
a3 = a2*4;
a3 = a2 * a1; (assume a2, a1 both less
than 128 ).
a0 = - a1;
a0 = - 1;
     int a,b,c,d,eq;

     a = 16;
     b = 32;
     d = 64;
     c = a + b;
     if(c==d) eq = 1;
     else     eq = 0;
start is at 100Hex, and a0, a1, a2 at
500, 501, 502 (Hex), manually assemble the following:
Start:    LODD a0
          ADDD a1
          STOD a2
DW a0  (at 500Hex)
 ...
DW a10 (at 50AHex)
DW x       50B
DW y       50C
DW z       50d

Start:    LODD a0
          ADDD a1
          STOD a2
          JZER Zero
          LOCO 0
          STOD x
          STOD y
          LOCO 10
          STOD z
          JUMP Lab1
Zero:     LOCO FF
          STOD x
          LOCO 1
          STOD y
          LOCO 2
          STOD z
Lab1:     ...
DW one 1 (one is at 50BHex)

If:       LODD a0
          SUBD a1
          JZER Then

Else:     LODD a10
          ADDD one
          ADDD one
          JUMP Next

Then:     LODD a10
          ADDD one

EndThen:  JUMP Next
Next:     .....
LOCO FFFH is contained
in address 100H,
     Addr.     Instruction
     -----     -----------
     100       0500
     101       2500
     102       2500
     103       1501
     104       3502
     105       4109
     106       0505
     107       1503
     108       610c
     109       0504
     10a       1503
     10b       610c
          a1 = 3*a0;
          if(a1>a2) a3 = a4;
          else      a3 = a5;
Explain.